Wall Decor Home

 If you’ve previously embarked on challenge of enhancing your house, whether it’s a tiny apartment or a sizable room, you know what challenging it may be locate huge works of art to hang on wall. That’s not to mention that artwork is costly! As any DIYer understands, but there’s always room to try your hand at some DIY wall surface art! With just some products plus some time, you can create large pieces which are sure to produce a striking focus in your home.
We developed these two large paintings, combined to help make a diptych, with only a few products many creativity! Find the full step-by-step instructions below with this DIY wall art project.

Step 1
Begin by sanding down your items of lumber. Make sure to sand using the grain of timber, and don’t forget to polish within the edges.
Whenever you’re done, make sure to use a tack fabric to wipe down the timber before you start staining.
Step Two
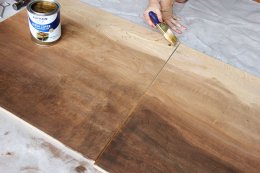
When you’ve done sanding and wiped the wood clean, you could begin staining. Usage either a staining pad or on a clean fabric to wipe the stain from the bottom two inches or more associated with lumber.
 Work the stain in to the timber with a cloth, after that wipe it well with a clean cloth.
3
To create the ombre impact, we utilized paint thinner to lighten the stain. First, we used the first stain regarding extremely base of the board, then when I worked up, we slowly added increasingly more paint slimmer into a cup of stain to gradually lighten colour.
Step Four
You can observe here that I worked the stain (diluted with paint thinner) to the wood, generating a progressive lighting.
Step 5
As soon as you’re pleased with the gradations into the color, it is possible to move onto the silver.
We employed exactly the same method for the gold as the stain, including silver with its initial kind to the the surface of the timber, after that slowly incorporating paint slimmer when I moved toward the center. As this Rust-Oleum paint is oil-based, you should use paint slimmer to dilute the paint. This technique means that the paint has the exact same shade, it just continues on thinner, generating a lighter finish. slowly go toward the middle of the board using the diluted gold paint to generate your ombre finish.
Important note: Before painting because of the gold, make sure you read the instructions, which discourage you against working a lot of using paint or adding another layer.
Action 6
Here, you can view that gold is extremely dense in the bottom, but slowly lightens because moves toward the center.
Let the timber dry for a number of days before moving on the alternative.
Action 7
To provide my paintings a finished appearance, I made a decision to utilize a patching ingredient regarding the sides.
We tackled this once the tarnish and paint dried entirely because used to don’t wish any patching chemical to obtain onto the board pre-stain. This would create plenty of stain when the stain had been put on the timber. I understood when We applied the patching substance following the stain, I’d be much more cautious, and I’d instantly be able to spot any flecks of element back at my fabric, and I also could rapidly remove them. Either strategy would produce comparable outcomes however.
You can make use of a putty blade or hammer end joint blade to generate a smooth finish over the edges. You need the patching compound to-be as smooth possible, but you will be sanding the edges after the element is dried, so it does not have to be totally perfect.


|
Ussore Wall Sticker Removable Cute Man Woman Washroom Toilet WC Sticker Family DIY Decor Art Wall Stickers Home Decor Wall Art For Kids Home Living Room House Bedroom Bathroom Office Home Decoration Home (Usstore)
|
|
Ussore Wall Sticker 44*120CM Symbol Word Love Vinyl Art Wall Stickers Home Decor Wall Art For Kids Home Living Room House Bedroom Bathroom Kitchen Office Home Decoration Baby Product (Usstore)
|
|
|
Dearm-home® 6'(h) X 9'(w) Huge Size Family Photo Frame Tree Quote Picture Removable Wall Decor Art Stickers Vinyl Decals Home Decor Include 11birds for Living Room&bedroom Home (Dearm-home®)
|